Last Updated 2021.01.31
UpdraftPlus is an easy backup / restore plugin used all over the world
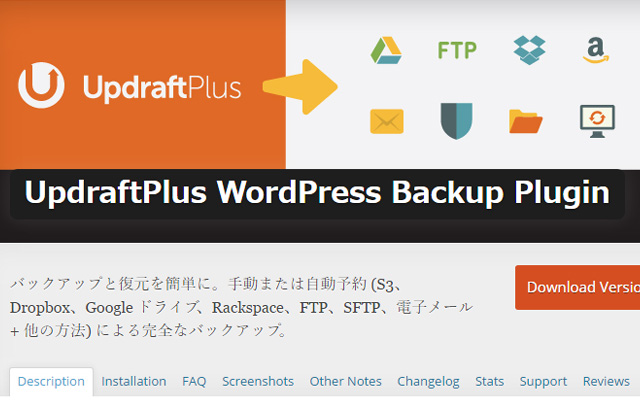
About backing up WordPress sites If you search with a search engine such as Google, you will find many sites that explain how to back up using a plugin called BackWPUp, but the method of restoring the data backed up with this plugin is a little troublesome. It was an impression that it was.
Since backups are backups that can only be restored, I was looking for a plugin that could be easily backed up and restored, and I found a plugin called UpdraftPlus.
UpdraftPlus is the world’s # 1 WordPress backup plugin that is used worldwide and has over 1 million downloads. I’m wondering if it’s easy to use because it’s No. 1 in the world. I would like to mention the features of Updraft Plus.
Features of UpdraftPlus plugin
- Backup and restore can be operated with one click
- Backup scheduling function: Selectable from 1 day, 1 week, 2 weeks, 1 month from every few hours
- You can specify the number of backup data to be retained: Old backups will be deleted automatically. If you set to keep 14 backups every day, the backup data from the last 15 days will be deleted automatically.
- Link with cloud storage: Backup data can be saved on the cloud by linking with cloud storage such as DropBox.
- Duplicate function: Can be used when copying the entire WordPress site and migrating to another server, etc.
- Selectable content and plugins to back up
There are detailed setting items and functions, but the above features are necessary for backing up the site.
The reason I chose the UpdraftPlus plugin is that it is easy to back up and restore, and it automatically deletes old backup data by specifying the number of backup data to be retained.
Managing the number of backup data to be retained is a simple and troublesome process when it is actually executed as a program, and it is easy if you just stack up the backup data, but if it is old data from a few days ago, it is it. The process of deleting is a troublesome part for program processing.
The advantage of setting the number of backup data to be retained is that old data that is not used when restoring the site is automatically deleted, so you do not have to overwhelm the capacity of the server or cloud storage.
Once you’ve set up your backup with Updraft Plus, you can just leave it alone. Updraft Plus handles all backup scheduling and backup data retention management.
I think this is appreciated not only for WordPress beginners but also for many WordPress publishers.
If WordPress does it automatically, it matches the management stance of this site that it will be left to it.
If you run a WordPress site, I definitely recommend you to install this plugin.
How to install UpdraftPlus plugin
Below this item, we will explain how to back up the UpdraftPlus plugin using a cloud storage service called Dropbox.
Dropbox is a cloud storage service
Dropbox is one of the cloud storage services, which provides a data storage area on the Internet.
Cloud storage services such as Dropbox store data on the Internet, but please be assured that there is no security concern as it is only accessible to the account person unless it is basically published.
Dropbox is recommended on this site because it is easy to register and use.
- DropBox: Free plan Cloud storage service with 2GB capacity
- Click here to register for a Dropbox account
If you register your Dropbox account from the link above, you can use the capacity of 2500MB, which is usually 2000MB but 500MB added. If you do not have a Dropbox account, please take this opportunity to get one.
Once you have a Dropbox account, you’ll see an announcement telling you to install an application that accesses Dropbox on your PC. After downloading and installing the application, you will be able to access Dropbox from your PC as if you were accessing folders and files in Explorer. It’s convenient because you don’t need to use a browser to use Dropbox, so it’s recommended that you also install the application.
Install the UpdraftPlus plugin
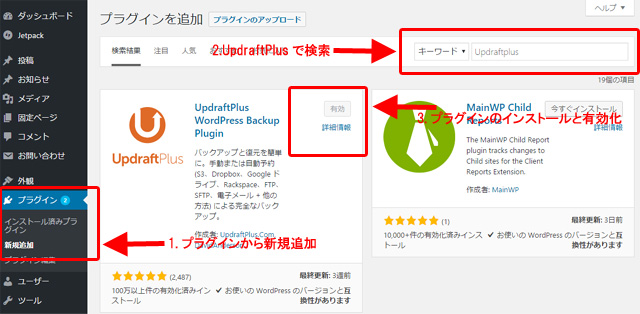
- Click ” Plugins “-> ” Add New ” on the WordPress administration screen
- Search for keywords with ” UpdraftPlus “
- After installing the UpdraftPlus plugin, activate it
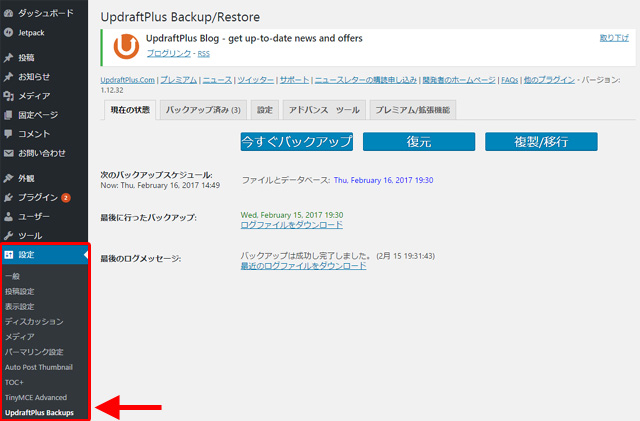
From the WordPress administration screen , click ” Settings ” → ” UpdraftPlus Backups ” to move to the UpdraftPlus settings screen. There are not many items to set. The current status tab is displayed, but let’s move to the setting screen by clicking the ” Settings ” tab.
UpdraftPlus plugin backup settings
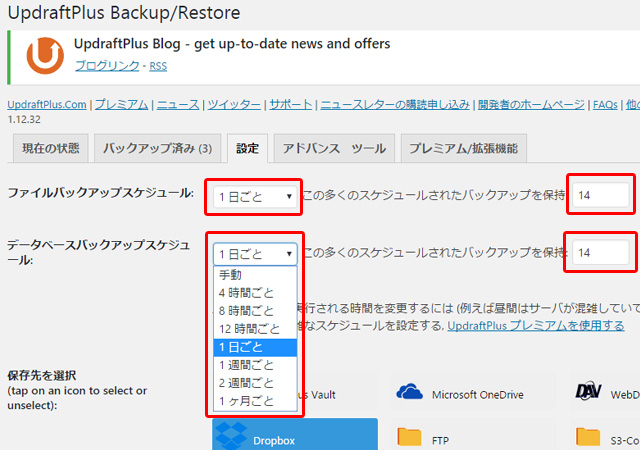
In the red frame in the above figure, set the file backup schedule and database backup schedule .
The figure above is an example of setting a backup schedule.
- File backup schedule : Backup every day and keep 14 files
- Database backup schedule : Backup every day and keep 14
In the above setting example, both the file and database are backed up every day and the backup for the past two weeks is retained. The file backup schedule and the database backup schedule can be set separately, but from the viewpoint of ensuring the consistency between the file backup and the database backup, it is recommended that the file and database backup be taken at the same timing on this site. I will.
Setting the backup data save destination
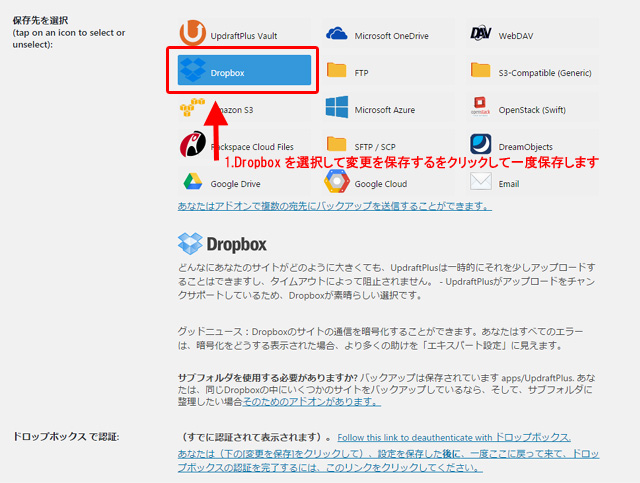
As shown in the above figure, select “Dropbox” in Select save destination, specify the save destination as Dropbox, and then click the “Save changes” button at the bottom of the management screen to save the settings.
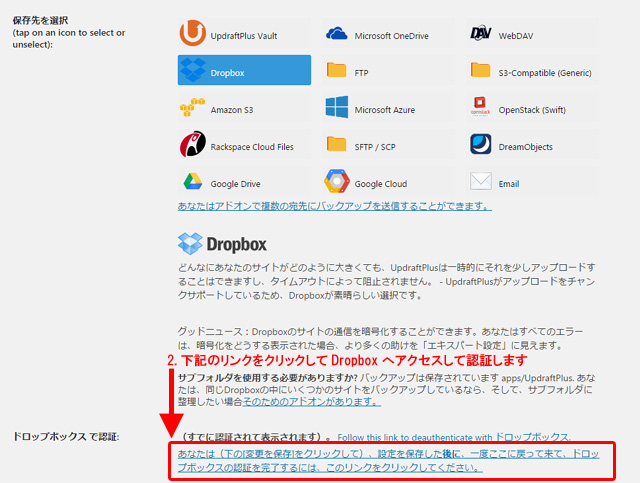
Save to Dropbox After saving your settings, click the “Authenticate with Dropbox” link to access the Dropbox site. The login screen for the Dropbox site will appear, so log in with a valid account.
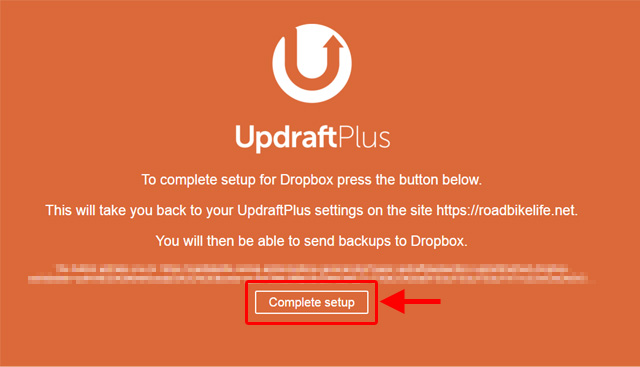
If you see a screen like the one above, your WordPress site’s UpdraftPlus plugin has been successfully integrated with Dropbox. Click the “Complete setup” button to return to the administration screen of your WordPress site.
Your WordPress site is now set up to be automatically uploaded to Dropbox after being backed up using the UpdraftPlus plugin. Just in case, let’s save the settings by pressing the “Save changes” button at the bottom of the management screen.
Set up files to back up with Updraft Plus
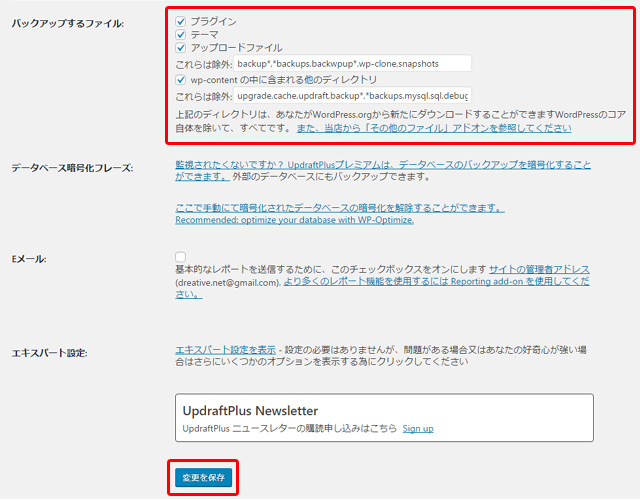
In the “Files to back up” part surrounded by the red frame in the above figure, specify the files to be backed up.
Normally, the default state where all are checked is fine.
There is no need to set any exclusion items.
After confirming the check of the setting items of the file to be backed up, click the “Save changes” button to save the settings.
Start backup with Updraft Plus
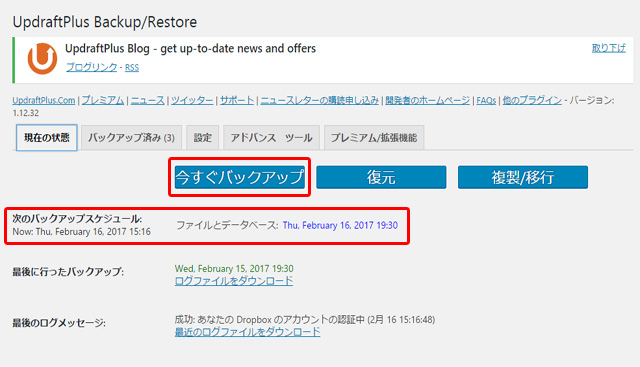
- Click the “Current Status” tab on the Updraft Plus settings screen
- When the current status is displayed, click “Backup Now”
- Since the next backup schedule is set, check whether the date and time of the next backup is scheduled according to the backup setting.
This completes the backup settings for Dropbox using the UpdraftPlus plugin.
When your WordPress site is backed up with UpdraftPlus, it will be automatically uploaded and saved to Dropbox.
The Dropbox application will notify you that the backed up files have been uploaded on your PC.
Your WordPress site is now set to be backed up automatically.
How to restore data with Updraft Plus
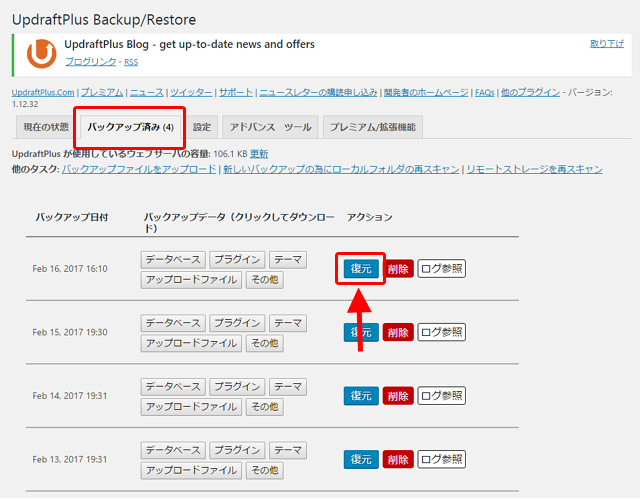
To restore the backed up data, click the “Backed up” tab and click the “Restore” button, and a screen for selecting the data to be restored will appear.
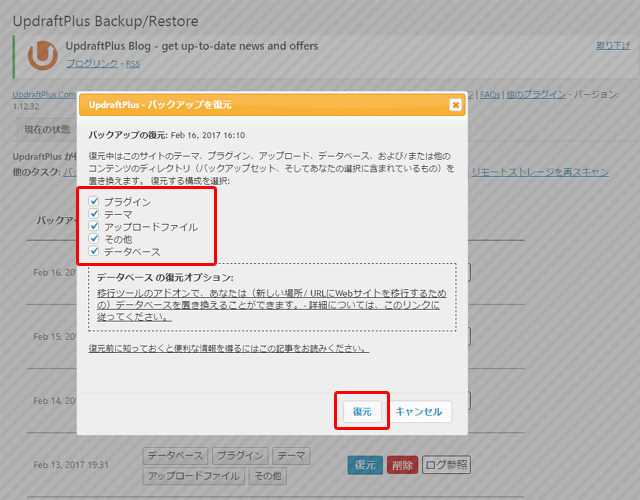
As shown above, there are checkboxes to restore plugins, themes, upload files, others, and databases individually. If you want to restore the entire WordPress site, check all the checkboxes and click the “Restore” button to start the restoration from the backup data.
This is the only operation to restore a WordPress site from backup data.
That’s all about the settings, operation method, and restoration for backing up your WordPress site using the UpdraftPlus plugin. How was it? Once set, backup and restore can be done with a simple click operation, so it is a plugin that is appreciated by WordPress beginners.
If you like, please refer to this article and install Updraft Plus.


