Last Updated 2022.01.06
BROMPTON’s Petit Custom Accessories
As early as one month after the delivery of BROMPTON, I bought some parts from LORO’s online shop and installed them myself in order to further customize from the custom at LORO Setagaya last month.
Regarding installation, I think it’s a good idea to prepare in advance on YouTube.
In particular, replacing the seat clamp required a little trick to install, so preparation on YouTube is recommended.
Choose custom parts that you can replace yourself
The parts I purchased are H & H’s stem catcher and H & H’s quick release seat clamp set Ver2. For more information, please visit LORO’s online shop.
As of December 2021, it seems that this H & H parts brand is only available at each LORO Group store. There are similar products on the net, but there are many products whose parts accuracy is doubtful, so try to install custom parts that are as unique as possible.
The custom parts handled by the LORO group are BROMPTON and other parts optimized for each mini velo model, so there are some parts that are a little expensive, but since we are customizing a luxury bicycle called BROMPTON, the budget for customizing Be aware that it will be a little expensive and customize it.
In particular, BROMPTON is made in the UK, and there are many custom parts that have been collaborated with British brands. BROOKS is a representative British brand bicycle parts maker, but BROMPTON is also famous as a fashionable item, such as an apparel brand called Flytag and a brand famous for leather, so I would like to make custom parts with fashionable parts. ..
Stem catcher replacement
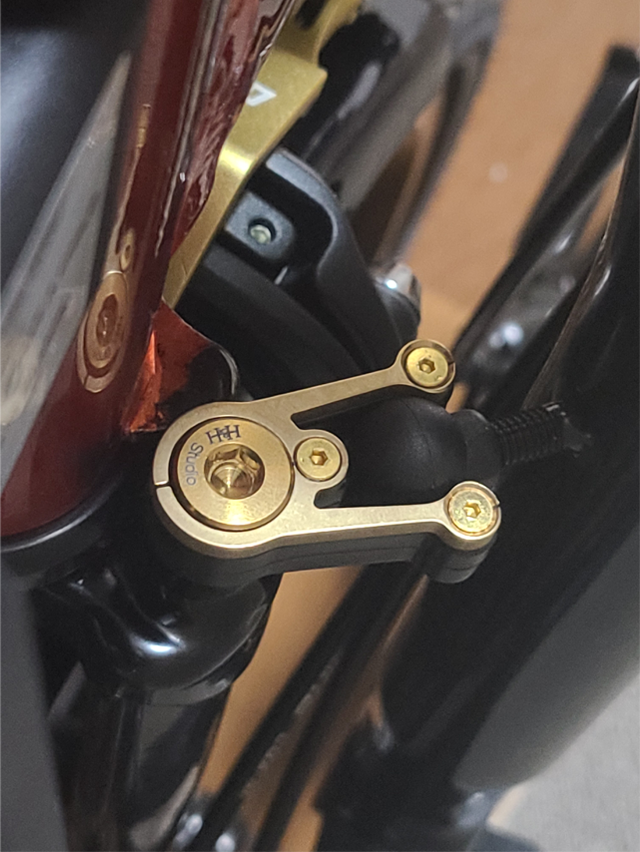
BROMPTON’s stem catcher is fixed with hexagon bolts, but the mounting angle is free, and if you loosen the bolts, the catcher will move freely. At first I thought that the angle to fix at 3 or 2 points was fixed, but it seems that it is necessary to actually fold the handle and apply the stem head to decide the angle to fix the catcher at the time of installation. ..
None of the removed stem catcher parts were reused. I often use washers, but this H & H stem catcher also comes with washers, so it will be replaced entirely.
Please note that the hexagon wrench used is different when removing the stem catcher and when installing the H & H stem catcher. The genuine stem catcher has 6mm bolts, and the H & H stem catcher has 5mm bolts.
When installing the stem catcher, fold the handle and apply the stem head, and tighten the bolts while deciding the fixing angle. The tightening torque is not specified, but if you tighten it too much, the parts of the stem catcher may crack, so be careful not to overtighten it.
Quick release seat clamp mounting
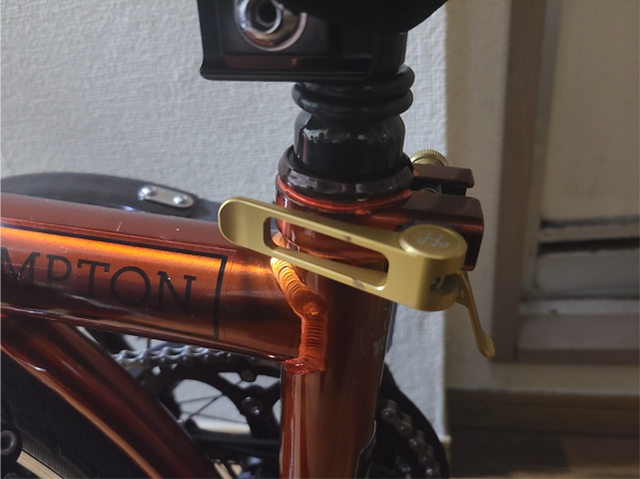
It is convenient to have a 10mm combination wrench as the tool required to replace the seat clamp. There is no problem with just a spanner, but it is convenient to have a box wrench to avoid screw licking. To remove the genuine seat clamp, loosen the 10mm nut, loosen the seat clamp, and push the head of the bolt with your finger to remove it all at once. Please note that if you pry it strangely, it may cause the paint to peel off. Pull out the bolt as if you were pulling it out horizontally without twisting as much as possible.
When replacing the parts of the seat clamp, insert the bolt into the half hole, then insert the collar, the rear hinge clip, and the spring into the bolt in this order, and while pushing the spring well, pass the bolt through the hole of the bolt on the opposite side. .. Also at this time, do not force it, and carefully pass it while making sure that the rear hinge clip passes under the frame properly. If the collar, rear hinge clip, and spring are properly threaded inside the bolt, the bolt can be threaded without much effort. When the bolt passes to the other side, tighten it with the nut.
This nut is machined from aluminum and is tightened by hand. Loosen the clamp and tighten the nut by hand to tighten the nut to the proper position. After that, check if the seat post is properly fixed when tightening the clamp, and then tighten the nut by hand.
There are surprisingly many parts that you can install yourself
BROMPTON has many washers, etc., and when installing custom parts, it is necessary to install while properly observing the order of washers, etc., so the difficulty of customizing is a little high. However, there are many parts that you can install neatly by yourself if you prepare in advance with videos. The stem catcher and seat clamp this time are examples.
Suspensions, kickstands, etc. require some tips to install, and safety is required for driving, so I think it is wise to ask the shop to install them.
If you want to customize the parts by removing the brakes and wheels, or removing the related bolts, you should ask the shop. I don’t care about it, and I ask at the shop as if I were buying the experience and know-how of a professional shop.
In addition, in the case of BROMPTON custom, damage to the frame caused by replacing parts is not covered by the warranty. Let’s accept that and customize it. In particular, the replacement of the hinge clamp of the frame is very different from the genuine one, and if it is not installed correctly or the hinge clamp is not fixed correctly, the risk of damaging the frame increases, so be careful. For hinge clamps, it is recommended to choose a reliable custom parts brand or use genuine ones.


